By: T13-4 Since: Aug 2018 Licence: MIT
1. Setting up
1.1. Prerequisites
-
JDK
10or laterJDK 10on Windows will fail to run tests in headless mode due to a JavaFX bug. Windows developers are highly recommended to use JDK9. -
IntelliJ IDE
IntelliJ by default has Gradle and JavaFx plugins installed.
Do not disable them. If you have disabled them, go toFile>Settings>Pluginsto re-enable them.
1.2. Setting up the project in your computer
-
Fork this repo, and clone the fork to your computer
-
Open IntelliJ (if you are not in the welcome screen, click
File>Close Projectto close the existing project dialog first) -
Set up the correct JDK version for Gradle
-
Click
Configure>Project Defaults>Project Structure -
Click
New…and find the directory of the JDK
-
-
Click
Import Project -
Locate the
build.gradlefile and select it. ClickOK -
Click
Open as Project -
Click
OKto accept the default settings -
Open a console and run the command
gradlew processResources(Mac/Linux:./gradlew processResources). It should finish with theBUILD SUCCESSFULmessage.
This will generate all resources required by the application and tests.
1.3. Verifying the setup
-
Run the
seedu.address.MainAppand try a few commands -
Run the tests to ensure they all pass.
1.4. Configurations to do before writing code
1.4.1. Configuring the coding style
This project follows oss-generic coding standards. IntelliJ’s default style is mostly compliant with ours but it uses a different import order from ours. To rectify,
-
Go to
File>Settings…(Windows/Linux), orIntelliJ IDEA>Preferences…(macOS)to add manually -
Select
Editor>Code Style>Java -
Click on the
Importstab to set the order-
For
Class count to use import with '*'andNames count to use static import with '*': Set to999to prevent IntelliJ from contracting the import statements -
For
Import Layout: The order isimport static all other imports,import java.*,import javax.*,import org.*,import com.*,import all other imports. Add a<blank line>between eachimport
-
Optionally, you can follow the UsingCheckstyle.adoc document to configure Intellij to check style-compliance as you write code.
1.4.2. Updating documentation to match your fork
After forking the repo, the documentation will still have the SE-EDU branding and refer to the se-edu/addressbook-level4 repo.
If you plan to develop this fork as a separate product (i.e. instead of contributing to se-edu/addressbook-level4), you should do the following:
-
Configure the site-wide documentation settings in
build.gradle, such as thesite-name, to suit your own project. -
Replace the URL in the attribute
repoURLinDeveloperGuide.adocandUserGuide.adocwith the URL of your fork.
1.4.3. Setting up CI
Set up Travis to perform Continuous Integration (CI) for your fork. See UsingTravis.adoc to learn how to set it up.
After setting up Travis, you can optionally set up coverage reporting for your team fork (see UsingCoveralls.adoc).
| Coverage reporting could be useful for a team repository that hosts the final version but it is not that useful for your personal fork. |
Optionally, you can set up AppVeyor as a second CI (see UsingAppVeyor.adoc).
| Having both Travis and AppVeyor ensures your App works on both Unix-based platforms and Windows-based platforms (Travis is Unix-based and AppVeyor is Windows-based) |
1.4.4. Getting started with coding
When you are ready to start coding,
-
Get some sense of the overall design by reading Section 2.1, “Architecture”.
-
Take a look at Appendix A, Target User Profile.
2. Design
tag::architecture[]
2.1. Architecture

The Architecture Diagram given above explains the high-level design of the App. Given below is a quick overview of each component.
The .pptx files used to create diagrams in this document can be found in the diagrams folder. To update a diagram, modify the diagram in the pptx file, select the objects of the diagram, and choose Save as picture.
|
Main has only one class called MainApp. It is responsible for,
-
At app launch: Initializes the components in the correct sequence, and connects them up with each other.
-
At shut down: Shuts down the components and invokes cleanup method where necessary.
Commons represents a collection of classes used by multiple other components. Two of those classes play important roles at the architecture level.
-
EventsCenter: This class (written using Google’s Event Bus library) is used by components to communicate with other components using events (i.e. a form of Event Driven design) -
LogsCenter: Used by many classes to write log messages to the App’s log file.
The rest of the App consists of four components.
Each of the four components
-
Defines its API in an
interfacewith the same name as the Component. -
Exposes its functionality using a
{Component Name}Managerclass.
For example, the Logic component (see the class diagram given below) defines it’s API in the Logic.java interface and exposes its functionality using the LogicManager.java class.
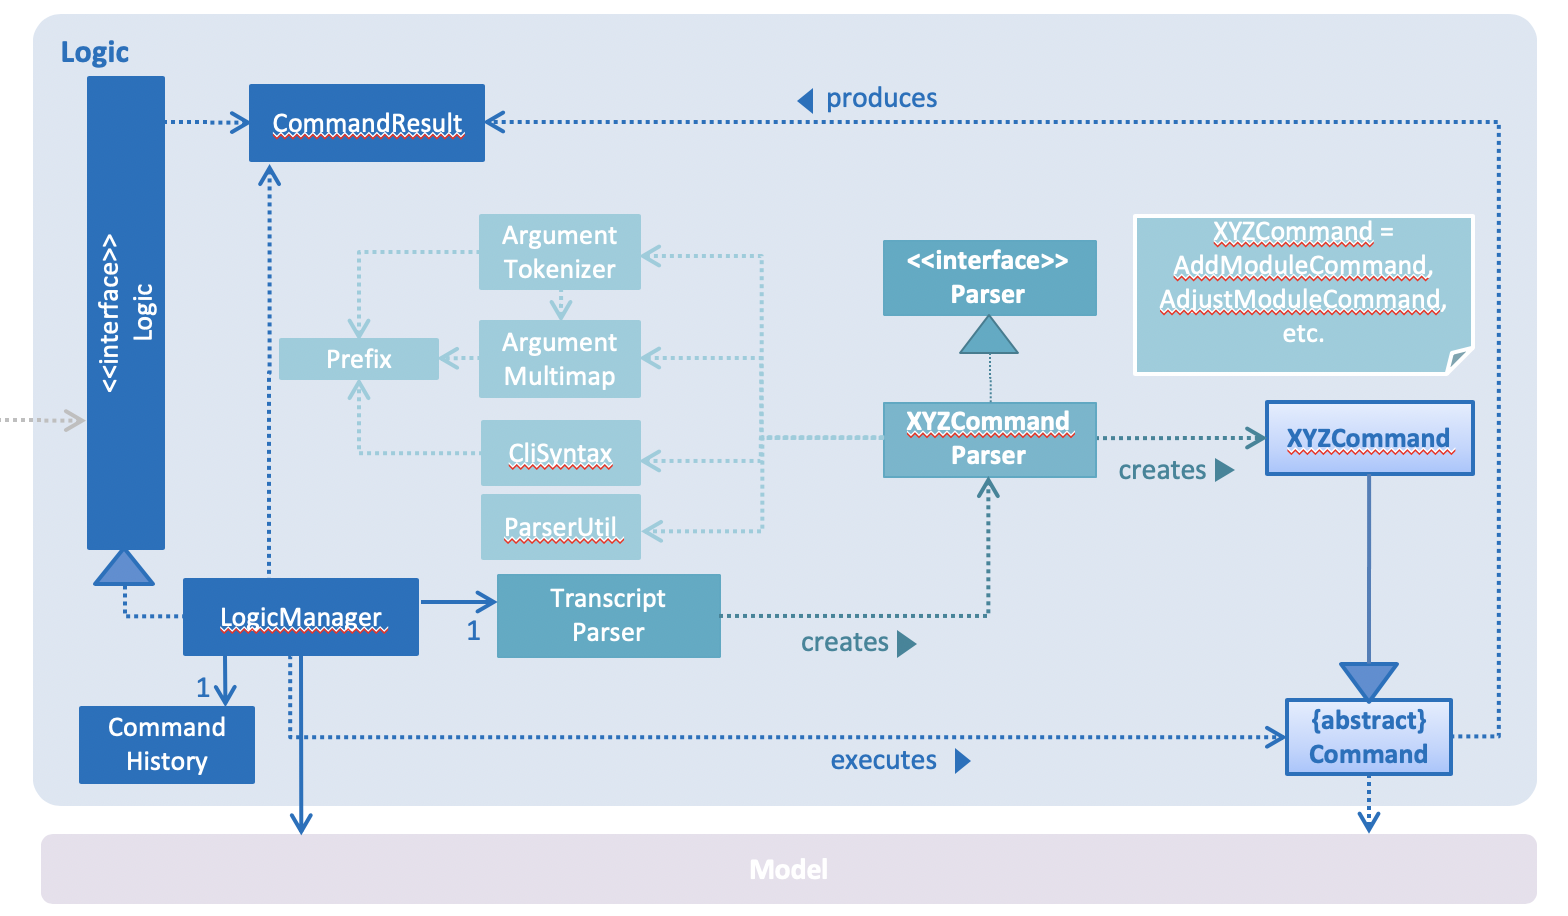
image::[width="800"]
Events-Driven nature of the design
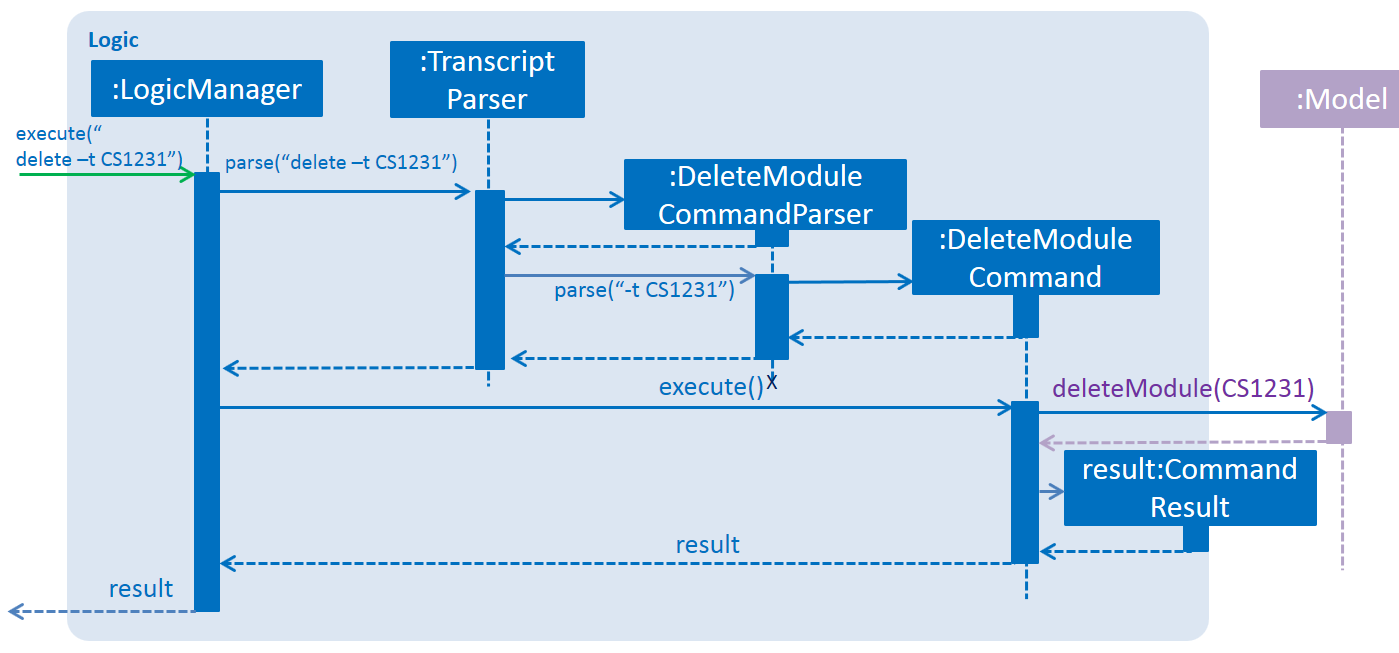
The Sequence Diagram below shows how the components interact for the scenario where the user issues the command delete -t CS2103 -e 4 -z 2.
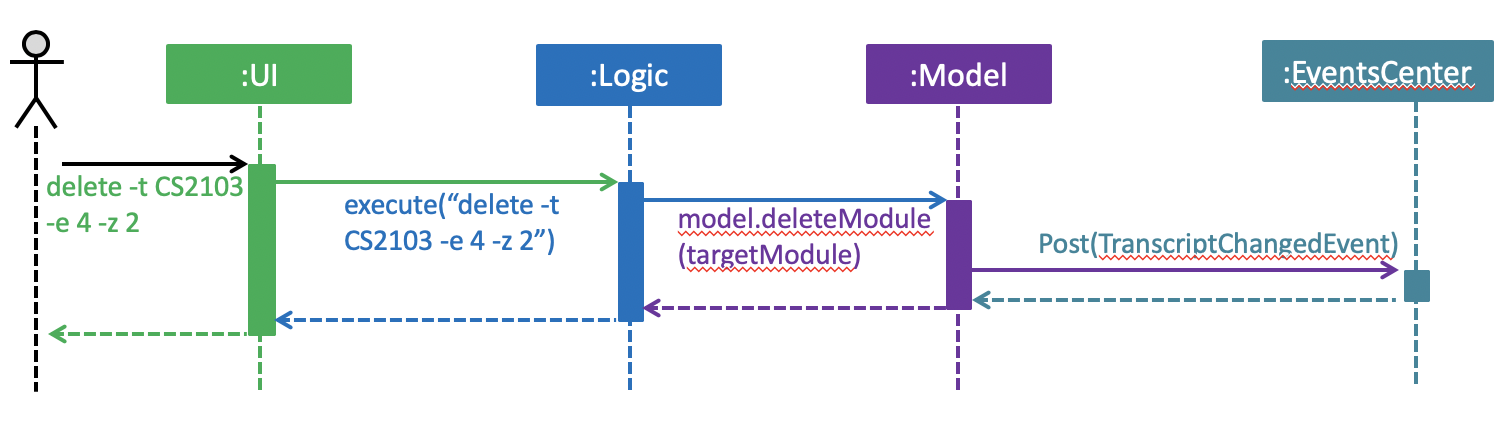
delete -t CS2103 -e 4 -z 2 command (part 1)
Note how the Model simply raises a TranscriptChangedEvent when the Transcript data are changed, instead of asking the Storage to save the updates to the hard disk.
|
The diagram below shows how the EventsCenter reacts to that event, which eventually results in the updates being saved to the hard disk and the panels of the UI being updated to reflect the latest modules in the system.
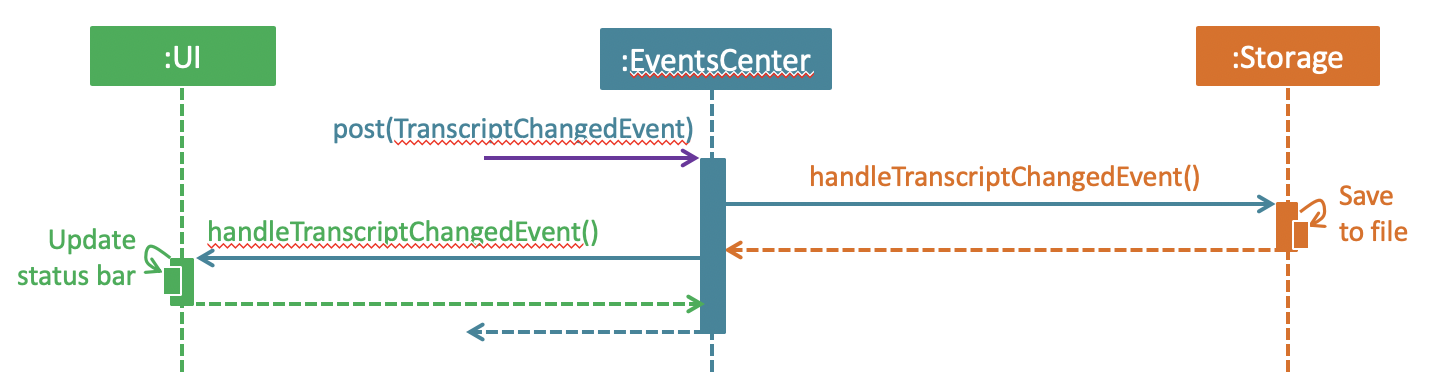
delete -t CS2103 -e 4 -z 2 command (part 2)
Note how the event is propagated through the EventsCenter to the Storage and UI without Model having to be coupled to either of them. This is an example of how this Event Driven approach helps us reduce direct coupling between components.
|
The sections below give more details of each component. end::architecture[]
2.2. UI component
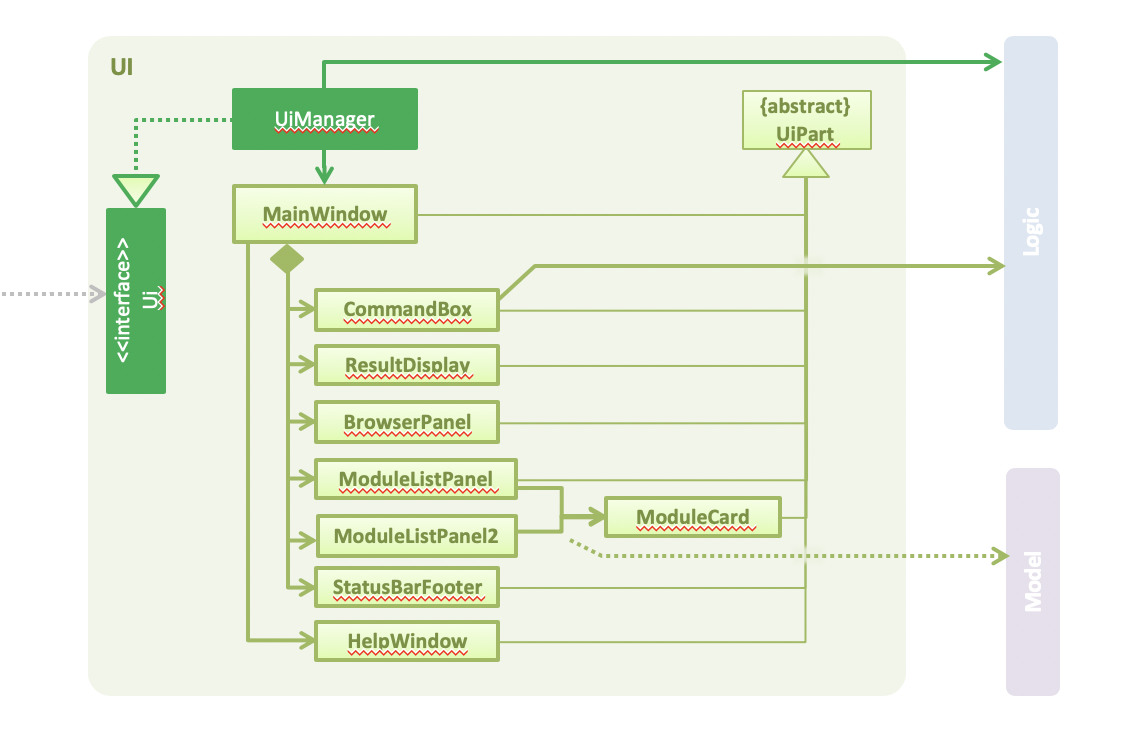
API : Ui.java
The UI consists of a MainWindow that is made up of parts e.g.CommandBox, ResultDisplay, StatusBarFooter, BrowserPanel, 'ModuleListPanel' etc. All these, including the MainWindow, inherit from the abstract UiPart class.
The UI component uses JavaFx UI framework. The layout of these UI parts are defined in matching .fxml files that are in the src/main/resources/view folder. For example, the layout of the MainWindow is specified in MainWindow.fxml
The UI component uses JavaFX UI 'DarkTheme' to draw different text, sizes, fonts, and colours from. The actual data displayed in the UI is called using a sample transcript which is created through the Module and Transcript classes. The values themselves are abstracted from the '.fxml' files so the UI display can be easily updated.
-
Executes user commands using the
Logiccomponent. -
Binds itself to some data in the
Modelso that the UI can auto-update when data in theModelchange. -
Responds to events raised from various parts of the App and updates the UI accordingly.
2.3. UI component
-
The bottom two thirds of the UI is seperated into 2 panels to clearly identify the different outputs from commands entered by the user.
-
The first panel on the left is for Modules that have already been completed; this is shown by the GREEN circles which surround the grades which indicate this grade is "set" and of no concern to the user anymore.
-
The second panel on the right is for Modules that have not yet been completed by the user; this is shown by the RED circles which surround the grades to indicate that this is a grade the user should be aware of. The red indicates an urgency towards that module as it’s outcome will affect the users predicted CAP goal.
-
The top third of the UI is seperated into four distinct rows;
-
The first row contains the title and drop down menu’s for
FileandHelpoptions. -
The second row is the command line and how the user interacts with the application. Notice there is no button for the user to click when they are ready to enter their command; it is expected the user is familiar with Command Line Interface and will know to use the
enterbutton on their keyboard when ready to submit a command to the app. -
The third row is where replies from the application to the user will be displayed. When the commands become too big for the box, a scroll down option becomes available for the user to continue reading the message.
-
The fourth row displays the summary of the users current CAP goal and their target CAP.
-
2.4. Logic component
API :
Logic.java
-
Logicuses theTranscriptParserclass to parse the user command. -
This results in a
Commandobject which is executed by theLogicManager. -
The command execution can affect the
Model(e.g. adding a module) and/or raise events. -
The result of the command execution is encapsulated as a
CommandResultobject which is passed back to theUi.
Given below is the Sequence Diagram for interactions within the Logic component for the
execute("delete -t CS1231") API call.
delete -t CS1231 Command2.5. Model component
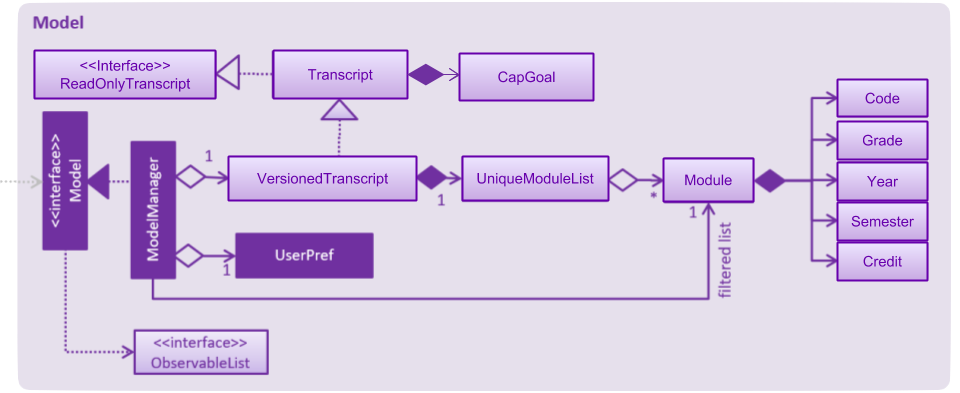
API : Model.java
The Model,
-
stores a
UserPrefobject that represents the user’s preferences. -
stores the Transcript data.
-
exposes an unmodifiable
ObservableList<Module>that can be 'observed' e.g. the UI can be bound to this list so that the UI automatically updates when the data in the list change. -
does not depend on any of the other three components.
-
provides filter function to filter
Modulewith different kind ofGrade
2.6. Storage component
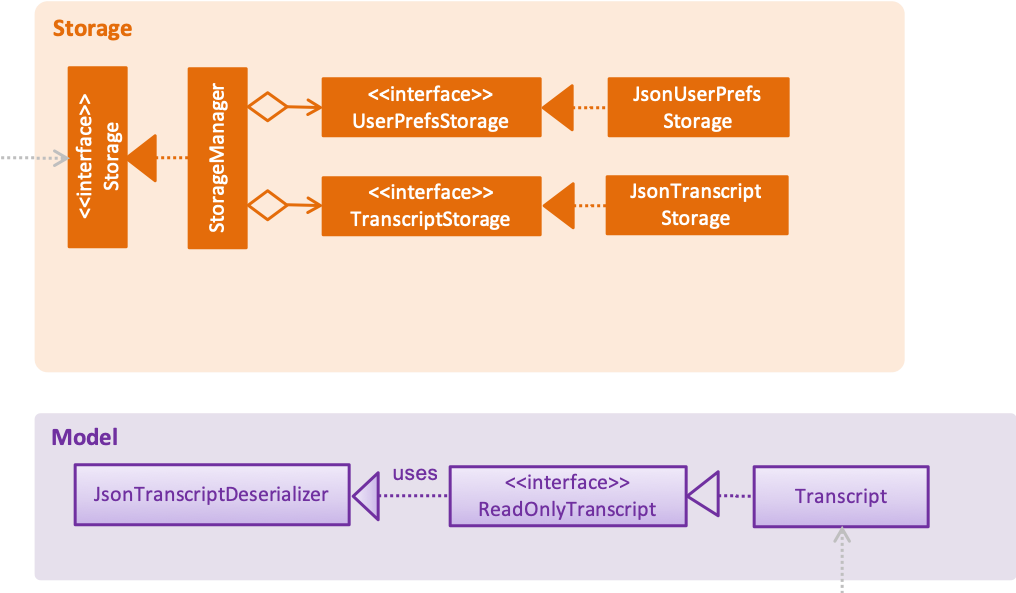
API : Storage.java
The Storage interface defines a component which
-
can save
UserPrefobjects in JSON format and read it back. -
can save Transcript data in JSON format and read it back.
The StorageManager implements the Storage interface, and updates the transcript JSON file when the TranscriptChangedEvent is fired (see Figure 4). It also logs the reading and saving of transcript data.
2.7. Common classes
Classes used by multiple components are in the seedu.addressbook.commons package.
3. Implementation
This section describes some noteworthy details on how certain features are implemented.
3.1. CAP & Target Grades Calculation
The two calculations are triggered upon an change to the list of modules in Transcript i.e. add/update/delete.
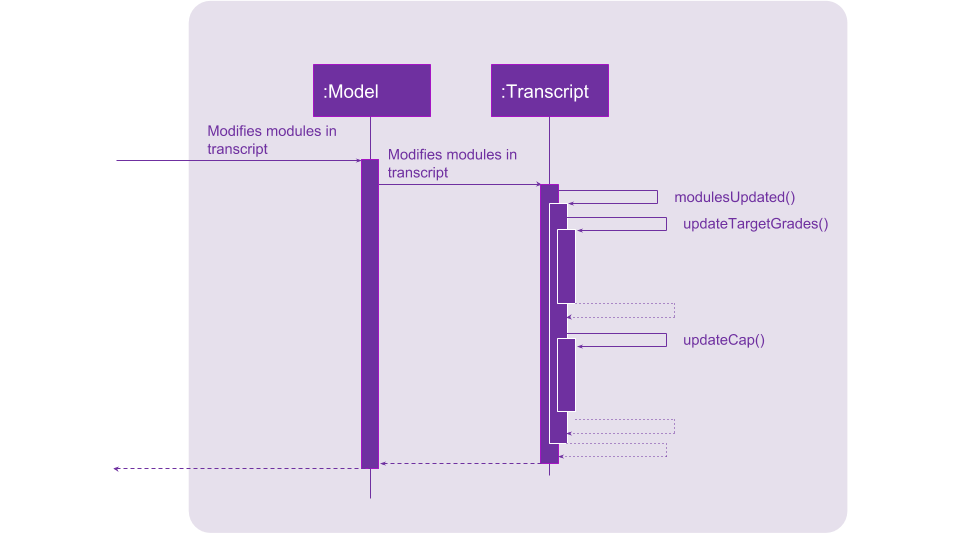
3.1.1. CAP Calculation
The CAP calculation is handled by Transcript.
The pseudo-code for CAP is the following:
all_points <- sum(credits(m) * points(m) for all completed modules m)
all_credits <- sum(credits(m) for all completed modules m)

CAP <- all_points/all_credits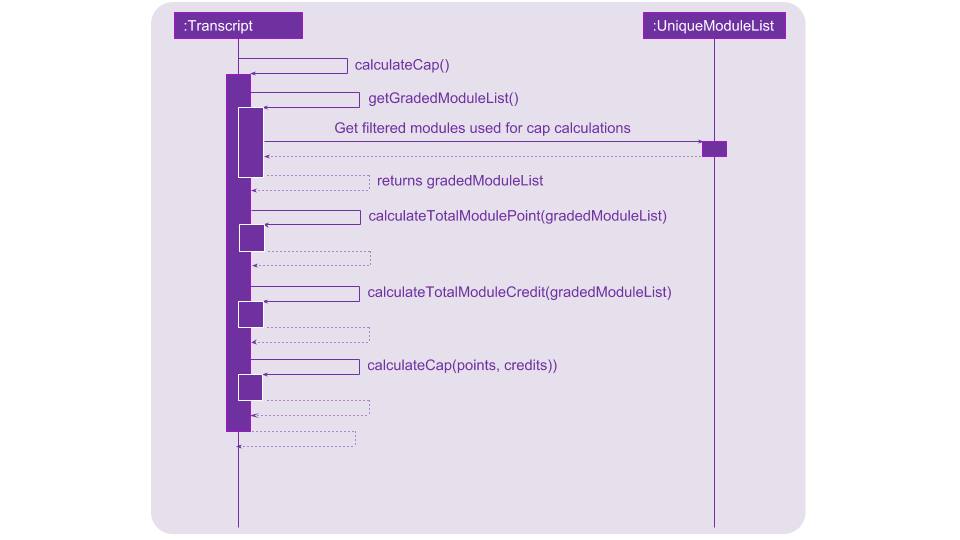
CAP Calculation is triggered by:
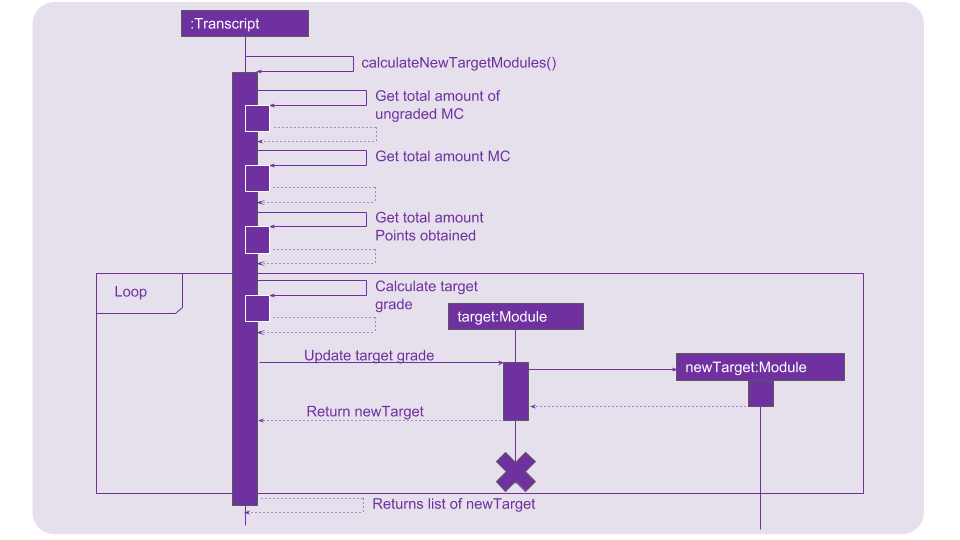
3.1.2. Target Grades Calculation
The target Grade calculation is facilitated by Transcript.
The returned list of modules with target Grade assures the following properties:
-
Reducing the
Gradeof any proposed target will result in the increase of another. -
If
xis the minimumGraderequired when assigned to all modules to obtain the desired CAP Goal, none of the proposed targetGradewill be greater thanxi.e. if assigning
B+to all module is the minimal requirement to obtain the desired CAP Goal, none of the proposed targetGradewill beA-or above.
Below is the pseudo-code for Target Grade Calculation:
CG <- CAP goal of user.
TC <- total credit of completed and incomplete modules.
PO <- total points achieved from completed and adjusted modules.
P <- CG * TC - PO // total points needed to achieve from incomplete modules.
mc_remaining <- sum of module credit of all incomplete modules
accumulated_points <- 0
for every incomplete Module m:
avg_point_per_mc <- (P - accumulated_points) / mc_remaining
target(m) <- ceiling(avg_point_per_mc)
mc_remaining <- mc_remaining - credits(m)
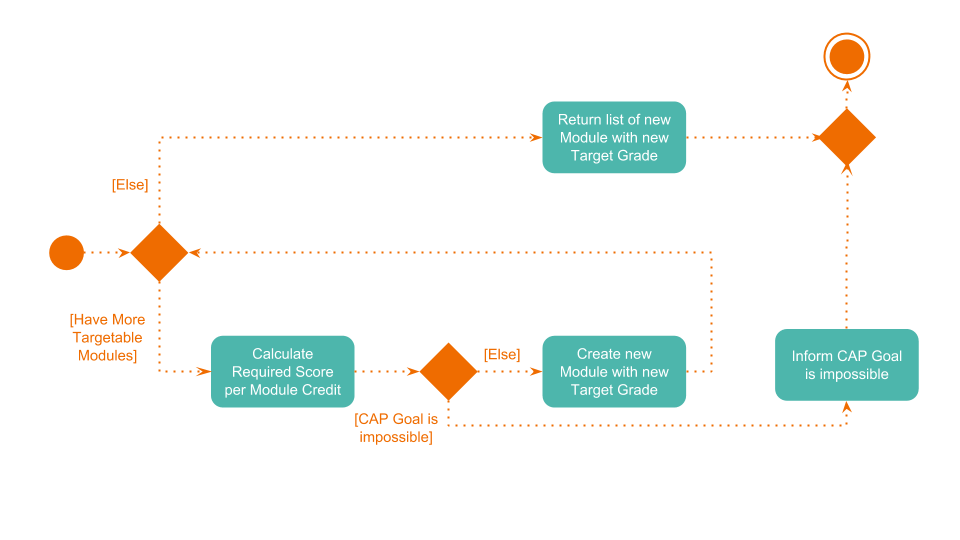
accumulated_points <- accumulated_points + (credits(m) * target(m))This sequence diagram shows the interaction of the different classes involved in the process of creating a new Module with updated target grade
And below the activity diagram to further illustrate several exceptional cases.

3.2. Transcript Storage: Reading and Writing
Whenever the in-memory Transcript object is changed, the transcript data file is updated. When the app initializes, it will look for an existing data file from which to load the transcript.+
If the file is not found, the app will initialize with an empty Transcript.+
If the file is found but the data is an incorrect format or there is some problem reading from the file, the app will initialize with an empty Transcript as well.+
When the app initializes, it looks for the file name provided by data/preferences.json under the transcriptFilePath key - by default this is data/transcript_demo.json. This file stores all transcript data including modules data and cap Goal information, such as its value, whether it is set, and whether it is impossible. The transcriptFilePath may be changed manually by the user.+
By using the Jackson library to store the Transcript data as a JSON file instead of an XML file, we avoid having to write XMLSerializableTranscript and XMLAdaptedModule classes. Instead, we simply register a custom JSONTranscriptDeserializer on the ReadOnlyTranscript class so that when we read from the JSON file, Jackson’s ObjectMapper is able to use the values to reconstruct the saved object.
3.3. Logging
We are using java.util.logging package for logging. The LogsCenter class is used to manage the logging levels and logging destinations.
-
The logging level can be controlled using the
logLevelsetting in the configuration file (See Section 3.4, “Configuration”) -
The
Loggerfor a class can be obtained usingLogsCenter.getLogger(Class)which will log messages according to the specified logging level -
Currently log messages are output through:
Consoleand to a.logfile.
Logging Levels
-
SEVERE: Critical problem detected which may possibly cause the termination of the application -
WARNING: Can continue, but with caution -
INFO: Information showing the noteworthy actions by the App -
FINE: Details that is not usually noteworthy but may be useful in debugging e.g. print the actual list instead of just its size
3.4. Configuration
Certain properties of the application can be controlled (e.g App name, logging level) through the configuration file (default: config.json).
4. Documentation
We use asciidoc for writing documentation.
| We chose asciidoc over Markdown because asciidoc, although a bit more complex than Markdown, provides more flexibility in formatting. |
4.1. Editing Documentation
See UsingGradle.adoc to learn how to render .adoc files locally to preview the end result of your edits.
Alternatively, you can download the AsciiDoc plugin for IntelliJ, which allows you to preview the changes you have made to your .adoc files in real-time.
4.2. Publishing Documentation
See UsingTravis.adoc to learn how to deploy GitHub Pages using Travis.
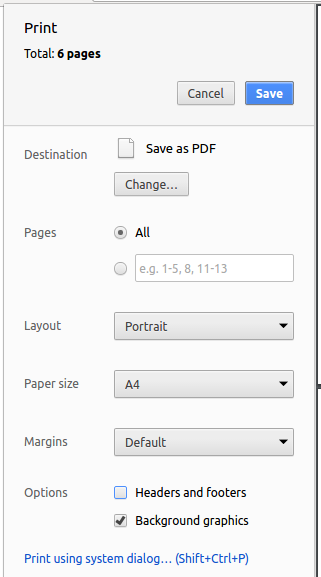
4.3. Converting Documentation to PDF format
We use Google Chrome for converting documentation to PDF format, as Chrome’s PDF engine preserves hyperlinks used in webpages.
Here are the steps to convert the project documentation files to PDF format.
-
Follow the instructions in UsingGradle.adoc to convert the AsciiDoc files in the
docs/directory to HTML format. -
Go to your generated HTML files in the
build/docsfolder, right click on them and selectOpen with→Google Chrome. -
Within Chrome, click on the
Printoption in Chrome’s menu. -
Set the destination to
Save as PDF, then clickSaveto save a copy of the file in PDF format. For best results, use the settings indicated in the screenshot below.
4.4. Site-wide Documentation Settings
The build.gradle file specifies some project-specific asciidoc attributes which affects how all documentation files within this project are rendered.
Attributes left unset in the build.gradle file will use their default value, if any.
|
| Attribute name | Description | Default value |
|---|---|---|
|
The name of the website. If set, the name will be displayed near the top of the page. |
not set |
|
URL to the site’s repository on GitHub. Setting this will add a "View on GitHub" link in the navigation bar. |
not set |
|
Define this attribute if the project is an official SE-EDU project. This will render the SE-EDU navigation bar at the top of the page, and add some SE-EDU-specific navigation items. |
not set |
4.5. Per-file Documentation Settings
Each .adoc file may also specify some file-specific asciidoc attributes which affects how the file is rendered.
Asciidoctor’s built-in attributes may be specified and used as well.
Attributes left unset in .adoc files will use their default value, if any.
|
| Attribute name | Description | Default value |
|---|---|---|
|
Site section that the document belongs to.
This will cause the associated item in the navigation bar to be highlighted.
One of: * Official SE-EDU projects only |
not set |
|
Set this attribute to remove the site navigation bar. |
not set |
4.6. Site Template
The files in docs/stylesheets are the CSS stylesheets of the site.
You can modify them to change some properties of the site’s design.
The files in docs/templates controls the rendering of .adoc files into HTML5.
These template files are written in a mixture of Ruby and Slim.
|
Modifying the template files in |
5. Testing
5.1. Running Tests
There are three ways to run tests.
| The most reliable way to run tests is the 3rd one. The first two methods might fail some GUI tests due to platform/resolution-specific idiosyncrasies. |
Method 1: Using IntelliJ JUnit test runner
-
To run all tests, right-click on the
src/test/javafolder and chooseRun 'All Tests' -
To run a subset of tests, you can right-click on a test package, test class, or a test and choose
Run 'ABC'
Method 2: Using Gradle
-
Open a console and run the command
gradlew clean allTests(Mac/Linux:./gradlew clean allTests)
| See UsingGradle.adoc for more info on how to run tests using Gradle. |
Method 3: Using Gradle (headless)
Thanks to the TestFX library we use, our GUI tests can be run in the headless mode. In the headless mode, GUI tests do not show up on the screen. That means the developer can do other things on the Computer while the tests are running.
To run tests in headless mode, open a console and run the command gradlew clean headless allTests (Mac/Linux: ./gradlew clean headless allTests)
5.2. Types of tests
We have two types of tests:
-
GUI Tests - These are tests involving the GUI. They include,
-
System Tests that test the entire App by simulating user actions on the GUI. These are in the
systemtestspackage. -
Unit tests that test the individual components. These are in
seedu.address.uipackage.
-
-
Non-GUI Tests - These are tests not involving the GUI. They include,
-
Unit tests targeting the lowest level methods/classes.
e.g.seedu.address.commons.StringUtilTest -
Integration tests that are checking the integration of multiple code units (those code units are assumed to be working).
e.g.seedu.address.storage.StorageManagerTest -
Hybrids of unit and integration tests. These test are checking multiple code units as well as how the are connected together.
e.g.seedu.address.logic.LogicManagerTest
-
5.3. Troubleshooting Testing
Problem: HelpWindowTest fails with a NullPointerException.
-
Reason: One of its dependencies,
HelpWindow.htmlinsrc/main/resources/docsis missing. -
Solution: Execute Gradle task
processResources.
6. Dev Ops
6.1. Build Automation
See UsingGradle.adoc to learn how to use Gradle for build automation.
6.2. Continuous Integration
We use Travis CI and AppVeyor to perform Continuous Integration on our projects. See UsingTravis.adoc and UsingAppVeyor.adoc for more details.
6.3. Coverage Reporting
We use Coveralls to track the code coverage of our projects. See UsingCoveralls.adoc for more details.
6.4. Documentation Previews
When a pull request has changes to asciidoc files, you can use Netlify to see a preview of how the HTML version of those asciidoc files will look like when the pull request is merged. See UsingNetlify.adoc for more details.
6.5. Making a Release
Here are the steps to create a new release.
-
Update the version number in
MainApp.java. -
Generate a JAR file using Gradle.
-
Tag the repo with the version number. e.g.
v0.1 -
Create a new release using GitHub and upload the JAR file you created.
6.6. Managing Dependencies
A project often depends on third-party libraries. For example, Address Book depends on the Jackson library for XML parsing. Managing these dependencies can be automated using Gradle. For example, Gradle can download the dependencies automatically, which is better than these alternatives.
a. Include those libraries in the repo (this bloats the repo size)
b. Require developers to download those libraries manually (this creates extra work for developers)
Appendix A: Target User Profile
-
An NUS Student who has a need to keep track of current CAP, calculate expected CAP, and grades required to achieve desired CAP.
-
Prefer desktop apps over other types.
-
Can type fast.
-
Prefers typing over mouse input.
-
Is reasonably comfortable using CLI apps.
Appendix B: Value Proposition
Helps students manage their CAP and predict what grades they need to reach their CAP goal.
Appendix C: User Stories
Must-Have
-
As a user, I can add all the modules I have taken (module code, module title, MCs, grade, semester taken) so that I can calculate average mark I need to graduate with desired CAP.
-
As a user I can delete modules so if I change my mind or fail a module I can re-calculate my average.
-
As a user I can delete modules so that if i entered a wrong module or failed it, I can remove it.
-
As a user I can edit the marks I’ve entered previously so that I can update my CAP.
-
As a user, I can enter a CAP goal so that I can keep track of the progress of my course
-
As a user, I can calculate the average mark I need across the modules I’ve entered so I can see what mark I need for each module to achieve my CAP goal.
-
As a user, I can enter in predicted grades for modules so I can see what CAP I would get if I got these grades in my modules.
-
As a user, I can close the app and return to modify my entries so I can enter my entries incrementally.
Nice-To-Have
-
As a user, I can add a module without having to add the code, MCs, or semester taken so that I can quickly calculate CAP without worrying about the modules.
-
As a user, I can still enter the same modules but get warned first so that I would not mistakenly enter the same module again
-
As a user, I can import all modules for this semester with NUSMods link so that my data can be consistent with NUSMods.
-
As a user I can search for a module via keyword or module title, and select it for entering my grade so that I don’t have to remember the module code.
-
As a user, I can adjust what marks I need for each module to achieve my CAP so I can put more emphasis on certain modules instead of expecting the same grade across all modules.
-
As a user, I can view my current semester’s module goals and use a GUI to adjust projected grade for each module, and other modules will automatically adjust to compensate, so that I can see easily modify my data to see what grades I need for other modules.
-
As a user, I can view total current MCs so that i can check if I meet the number of mc I need to graduate
-
As a user I can see if my CAP Goal is possible so I can check whether it is achievable.
-
As a user, I can list modules taken by level as an alternative listing mode, so that it is easier to track graduation requirements.
-
As a user, I can see what the highest possible CAP I can achieve with my current grades is so that I can set an appropriate goal.
-
As a user, I can see what the minimum grades I need per module is to pass the year with my current grades so that I can see what the minimum about of work I need to do is.
Not-Useful
-
As a user, I can view the module descriptions so that I know what modules I should take
-
As a user I can enter the MCs for exchange I can keep track of modules that may not be mapped to our database of modules codes or isn’t the default number of MCs.
-
As a user, I can export my timetable so that I can share it with my friend.
Appendix D: Use Cases
D.1. Use case: [UC1] Calculating current CAP
MSS
-
User enter modules
-
System recalculates CAP
-
System displays CAP
Use case ends.
Extensions
-
1a. User enters invalid parameters
-
1a1. System shows an
Invalid entryerror messageUse case ends.
-
-
1b. User enters duplicate Module
-
1b1. System shows an
Duplicate Moduleerror messageUse case ends
-
D.2. Use case: [UC2] View grades needed to achieve CAP goal
MSS
-
User enters completed Modules
-
User enters incomplete Modules
Step 1-2 are repeated until user is satisfied.
-
User enter CAP goal
-
System calculated target grades
-
System displays target grades for ungraded modules
Use case ends.
Extensions
-
3a. CAP goal is invalid
-
3a1. System shows an
Invalid CAP Goalerror messageUse case ends.
-
-
4a. There are no incomplete Modules and current CAP is lesser than CAP Goal
-
4a1. Go to step
5aUse case ends.
-
-
5a. CAP goal is not achievable
-
5a1. System inform that it is not achievable
Use case ends.
-
D.3. Use case: [UC3] Updating target grades
Pre-condition: [UC2] completed
MSS
-
User modify modules entries
-
System recalculates target grades for ungraded modules
-
System displays new target grades for ungraded modules
Use case ends.
Extensions
-
2a. CAP goal is not achievable with new set of modules
-
2a1. System inform that it is not achievable
Use case ends.
-
D.4. Use case: [UC4] Save entered module
MSS
-
User enters module
-
System saves the modules
Use case ends.
D.5. Use case: [UC5] Loading saved modules
Pre-conditions: [UC4] completed
MSS
-
User restarts the application
-
User list entered modules
-
System displays saved modules
Use case ends
D.6. Use case: [UC6] Adjusting target grades
Pre-conditions:
-
[UC2]completed -
There are targets given to incomplete modules
MSS
-
User adjust target
-
System recalculates target grades for remaining ungraded modules
-
System displays new target grades for remaining ungraded modules
Extensions
-
2a. CAP goal is not achievable with new set of modules
-
2a1. System inform that it is not achievable
Use case ends.
-
Appendix E: Non Functional Requirements
-
Should work on any [mainstream OS](https://github.com/nus-cs2103-AY1819S1/addressbook-level4/blob/master/docs/DeveloperGuide.adoc#mainstream-os) as long as it has Java 10 or higher installed.
-
Should be able to hold up to 100 modules without a noticeable sluggishness in performance for typical usage.
-
A user with above average typing speed for regular English text (i.e. not code, not system admin commands) should be able to accomplish most of the tasks faster using commands than using the mouse.
-
Should calculate prediction/expected CAP in 1 seconds
Appendix G: Instructions for Manual Testing
Given below are instructions to test the app manually.
| These instructions only provide a starting point for testers to work on; testers are expected to do more exploratory testing. |
G.1. Launch and Shutdown
-
Initial launch
-
Download the jar file and copy into an empty folder
-
Double-click the jar file
Expected: Shows the GUI with a set of sample contacts. The window size may not be optimum.
-
-
Saving window preferences
-
Resize the window to an optimum size. Move the window to a different location. Close the window.
-
Re-launch the app by double-clicking the jar file.
Expected: The most recent window size and location is retained.
-
-
Saving transcript data
-
Add some modules, set a CAP goal, and close the app.
-
Re-launch the app by double-clicking the jar file.
Expected: The added modules and CAP goal are retained.
-
-
Changing the transcript data file path
-
Add some modules, set a CAP goal, and close the app.
-
Change the value of
transcriptFilePathin the filedata/preferences.json(found in the same directory as the jar file) to some non-existent file such asdata/transcript_test.json. -
Re-launch the app by double-clicking the jar file.+ Expected: The app will initialize with an empty transcript (no modules or CAP goal). On further change, the app will save the transcript data to the new file
data/transcript_test..json.
-
-
Importing transcript data
-
Add some modules, set a CAP goal, and close the app.
-
Save another copy of the jar file in another directory and open and close this second app.
-
Replace the
data/transcript.jsonof the second app with thedata/transcript.jsonfrom the first app. -
Relaunch the new app.
Expected: The app will initialize with the added modules and CAP goal from the first app.+
-
G.2. CAP Calculation
| To further test the Correctness of CAP Calculation you can input your own combination of modules and verify it with This URL |
-
Initial CAP should be 0
-
Launch the application
-
Delete any Completed Modules already added
Expected: Current CAP should be 0
-
-
CAP should increase/decrease correctly while Adding modules
-
CAP score of 1 Module
-
Add a module(4MC, Grade B+) with the following command
add -m CS1010 -y 1 -s 1 -c 4 -g B+ -
Observe the current CAP
Expected: Current CAP should be 4.0
-
-
CAP score of 4 Module
-
Add another module(4MC, Grade A-) with the following command
add -m CS1020 -y 1 -s 2 -c 4 -g A- -
Observe the current CAP
Expected: Current CAP should be 4.25
-
Add another module(5MC, Grade C+) with the following command
add -m CS2010 -y 2 -s 1 -c 5 -g C+ -
Observe the current CAP
Expected: Current CAP should be 3.58
-
Add another module(5MC, Grade CS) with the following command
add -m CS2020 -y 2 -s 1 -c 5 -g CS -
Observe the current CAP
Expected: Current CAP should be 3.58
-
-
-
CAP should increase/decrease correctly while Editing modules
-
Edit one of the CS module with the following command
edit -t CS2020 -g B+ -
Observe the current CAP
Expected: Current CAP should be 3.69
-
Edit one of the 5MC module with the following command
edit -t CS2010 -c 4 -
Observe the current CAP
Expected: Current CAP should be 3.76
-
-
CAP should increase/decrease correctly while Deleting modules
-
Delete one of the module with the following command
delete -t CS2020 -
Observe the current CAP
Expected: Current CAP should be 3.67
-
Delete another one of the module with the following command
delete -t CS1020 -
Observe the current CAP
Expected: Current CAP should be 3.25
-
G.3. Target Grade Calculation
|
To follow this guide, ensure the there are only the following 2 modules: Completed Modules: CS1010 year 1 sem 1 credits 4 grade B+ add -m cs1010 -y 1 -s 1 -c 4 -g B+CS1020 year 2 sem 1 credits 4 grade C+ add -m cs2010 -y 2 -s 1 -c 4 -g C+
|
| You can also further verify that the given target grades together with the adjusted grades and completed grades indeed provide a CAP greater to or equal to your CAP Goal if it is possible with This URL |
-
Target Grade should not be calculated when there is no CAP Goal
-
Remove any CAP Goal with the following command
goal 0 -
Add 2 incomplete module with the following command (One after another)
add -m CS4234 -y 4 -s 1 -c 4
add -m CS4226 -y 4 -s 1 -c 4Expected: Both module should have grade NIL
-
-
Target Grade should not update upon entering an impossible CAP Goal
-
Add an impossible CAP Goal with the following command
goal 5.0 -
Observe the CAP Goal field
Expected: CAP Goal should be
5.0 (Impossible)and both modules should still have grade NIL
-
-
Target Grade should update upon entering an achievable CAP Goal
-
Change the CAP Goal to something achievable with the following command
goal 4.0 -
Observe the Target Grades of CS4234 and CS4226
Expected: CS4234 →
ACS4226 →A-
-
-
Target Grade should update upon entering an unachievable CAP Goal
-
Change the CAP Goal to something achievable with the following command
goal 5.0 -
Observe the Target Grades of CS4234 and CS4226
Expected: both modules should have grade NIL
-
-
Target Grade should update upon modifying the list of modules
-
Adding another completed module with good grade
-
Set a goal to something achievable with the following command
goal 4.0 -
Add a module with good grade with the following command:
add -m CS2100 -y 1 -s 2 -c 4 -g A -
Observe that the Target Grades of CS4234 and CS4226 have dropped
Expected: CS4234 →
A-CS4226 →B+
-
-
Adding another completed module with bad grade
-
Add a module with bad grade with the following command:
add -m CS2105 -y 2 -s 1 -c 4 -g C+ -
Observe that the Target Grades of CS4234 and CS4226 have increased
Expected: CS4234 →
ACS4226 →A
-
-
Adding another incomplete
-
Add another incomplete module with the following command:
add -m CS4231 -y 4 -s 2 -c 4 -
Observe that the Target Grades of CS4234 and CS4226 have dropped
Expected: CS4234 →
ACS4226 →A-CS4231 →A-
-
-
-
Adjusting target grade
-
Increasing a target grade should reduce another
-
Adjust CS4226 with the following command
adjust cs4226 A -
Observe the Target Grade of CS4234
Expected: CS4234 →
A-CS4231 →A-
-
-
Decreasing a target grade should reduce another
-
Adjust CS4226 with the following command
adjust cs4226 A- -
Observe the Target Grade of CS4234
Expected: CS4234 →
ACS4231 →A-
-
-
Decreasing a target grade causing goal to be impossible will not recalculate target grade
-
Adjust CS4226 with the following command
adjust cs4226 C+ -
Observe the CAP Goal field
Expected: CAP Goal should be
4.0 (Impossible)CS4234 →NILCS4231 →NIL
-
-
-
Adjusting multiple modules
-
Adjusting all modules to grades above what was target will be ok
adjust cs4226 A
adjust cs4234 A
adjust cs4231 A -
Observe the CAP Goal field
Expected: CAP Goal should still be 4.0
-
Adjusting all modules to grades below what was target will result in impossible CAP Goal
c_adjust cs4226 A-
c_adjust cs4234 A-
c_adjust cs4231 A- -
Observe the CAP Goal field
Expected: CAP Goal should be
4.0 (Impossible)
-