Overview
CAPTracker is for students who wants to use a desktop app for calculating and managing their CAP (Cumulative Average Point), allowing users to calculate their current CAP, and predict grades needed to achieve their ideal CAP in modules that haven’t been taken.
CAPTracker is optimized for those who prefer to work with a CLI (Command Line Interface) while still having the benefits of a Graphical User Interface (GUI) created with JavaFX.
CAPTracker is written in Java and has about 10kLoC.
Summary of contributions
-
Major enhancement: added the ability to view, display, and interact with CAPTracker.
-
What it does: allows users to understand and intuitively use the app with minimum additional instructions or hassel.
-
Justification: this feature improves CAPTracker significantly as it is the base at which the user interacts with the product. It not only increases the applications usability but also the seamless completion of tasks that CAPTracker allows.
-
Highlights: This enhancement affects the way the user uses the product and how vital information such as CAP calculations and predictions are displayed. It requires an understanding of user interaction and behaviour, as well as skills in design, colour complentation, and visual communication. The implementation was challenging in that it forced me to think like the user and have a good understanding of how the whole project works together as I was combining results from various aspects of the software project.
-
-
Minor enhancement: Added a help section that gives the user hints on what commands they can use to navigate the application depending on what command they were trying to execute.
-
Code contributed: https://nus-cs2103-ay1819s1.github.io/cs2103-dashboard/#=undefined&search=josephambe
-
Other contributions:
-
Project management:
-
Managed the initial setup of the project including delegating and organising tasks such as use case development, prioritizing user stories, identifying our value proposition, completing product surveys, separating non-functional requirements, defining project direction, target user profile, and problem addressed.
-
-
Enhancements to existing features:
-
Enhanced the automated replies from the application when the user enters an incorrect command. Specialised it to respond to specific commands entered and provide useful information that prevents the user from constantly having to refer back to the User Guide.
-
-
Documentation:
-
Updated the Developer Guide #2.2, #2.3,
-
Updated the User Guide on #3.11, 4.FAQ.
-
-
Community:
-
PR’s reviewed with non-trivial comments, and suggestions.
-
Contributed to discussions on the Slack Channel
-
Reported bugs and suggestions for other team members in class
-
The UI features I created was adopted by Yingnan in Group T13
-
-
Contributions to the User Guide
Given below are sections I contributed to the User Guide. They showcase my ability to write documentation targeting end-users. |
Initial Quick Start Image:

Understanding the User Interface
Understanding the User Interface can be tricky - what do all the different colours mean? How do I know what has been saved or not? Where can I see new modules I’ve added?
-
To view new modules you’ve added, scroll down to the bottom of the pannel that you have categorized your module under; either the 'Completed Modules' panel on the left, or the 'Incomplete Modules' panel on the right. Your new entry should be at the bottom of these lists.
-
Understanding the colours. The grades of modules in the 'Completed Modules' panel on the left are circled in GREEN. This indicates that this particular module has already been taken and this is a grade that the user does not need to worry about; it is in the past. The grades in the the 'Incomplete Modules' panel on the right are circled in RED. This indicates that this particular module has not been taken and that the grade displayed in this RED circle is not certain. It is a grade that the user needs to be aware of as it’s outcome will impact the users overall CAP score.
PLEASE NOTE: As I am focused on the UI design of the product, there is a limited amount of information I can contribute to the User Guide. This is because if I need to explain the interface in too much detail, it means the user can’t intuitively use the product, which in turn, means I haven’t designed a very good interface.
Part of my User Guide, which reminds users the format in which to type out commands, is integrated in the UI. This means that the user doesn’t have to keep switching back and forth between the User Guide and the product; they can receive the same information in real time when they need it.
FAQ
Q: I entered the year I took my module, 2018, and it doesn’t work. Why not?
A: The year of the module in CAPTracker doesn’t refer to the calander year, but instead the year that you are studying at. For example, a module taken in your second year of study would have a year value of 2.
Q: I entered a new module but can’t see it in the app. Where is it?
A: New modules you have added will appear at the bottom of the list in either the 'Completed Modules' list or the 'Incomplete Modules' list depending on your specification. Scroll down to the bottom of these lists to find your new module; it may not appear without you scrolling if there are already a number of mdoules entered!
Q: Why does my CAP goal say 'Impossible'?
A: Whether or not the users CAP goal is achievable is based on the grades of completed modules and the number of incomplete modules the user has entered. If the completed modules do not have sufficient grades to meet the CAP goal, try to add some modules you are planning to take; it may be that you need an A+ is four other modules before your CAP goal can be achieved. It is also based on the adjustments made by the user. For example, if the user originally enters
Q: I made the wrong adjustment to a module…how do I remove the adjustment I made?
A: To remove an incorrect adjustment, you need to delete that module (see delete command chapter 3.4) and add it back in with the desired/correct adjustments. A direct solution will be implemented in v2.0
Contributions to the Developer Guide
Given below are sections I contributed to the Developer Guide. They showcase my ability to write technical documentation and the technical depth of my contributions to the project. |
Architecture

The Architecture Diagram given above explains the high-level design of the App. Given below is a quick overview of each component.
The .pptx files used to create diagrams in this document can be found in the diagrams folder. To update a diagram, modify the diagram in the pptx file, select the objects of the diagram, and choose Save as picture.
|
Main has only one class called MainApp. It is responsible for,
-
At app launch: Initializes the components in the correct sequence, and connects them up with each other.
-
At shut down: Shuts down the components and invokes cleanup method where necessary.
Commons represents a collection of classes used by multiple other components. Two of those classes play important roles at the architecture level.
-
EventsCenter: This class (written using Google’s Event Bus library) is used by components to communicate with other components using events (i.e. a form of Event Driven design) -
LogsCenter: Used by many classes to write log messages to the App’s log file.
The rest of the App consists of four components.
Each of the four components
-
Defines its API in an
interfacewith the same name as the Component. -
Exposes its functionality using a
{Component Name}Managerclass.
For example, the Logic component (see the class diagram given below) defines it’s API in the Logic.java interface and exposes its functionality using the LogicManager.java class.
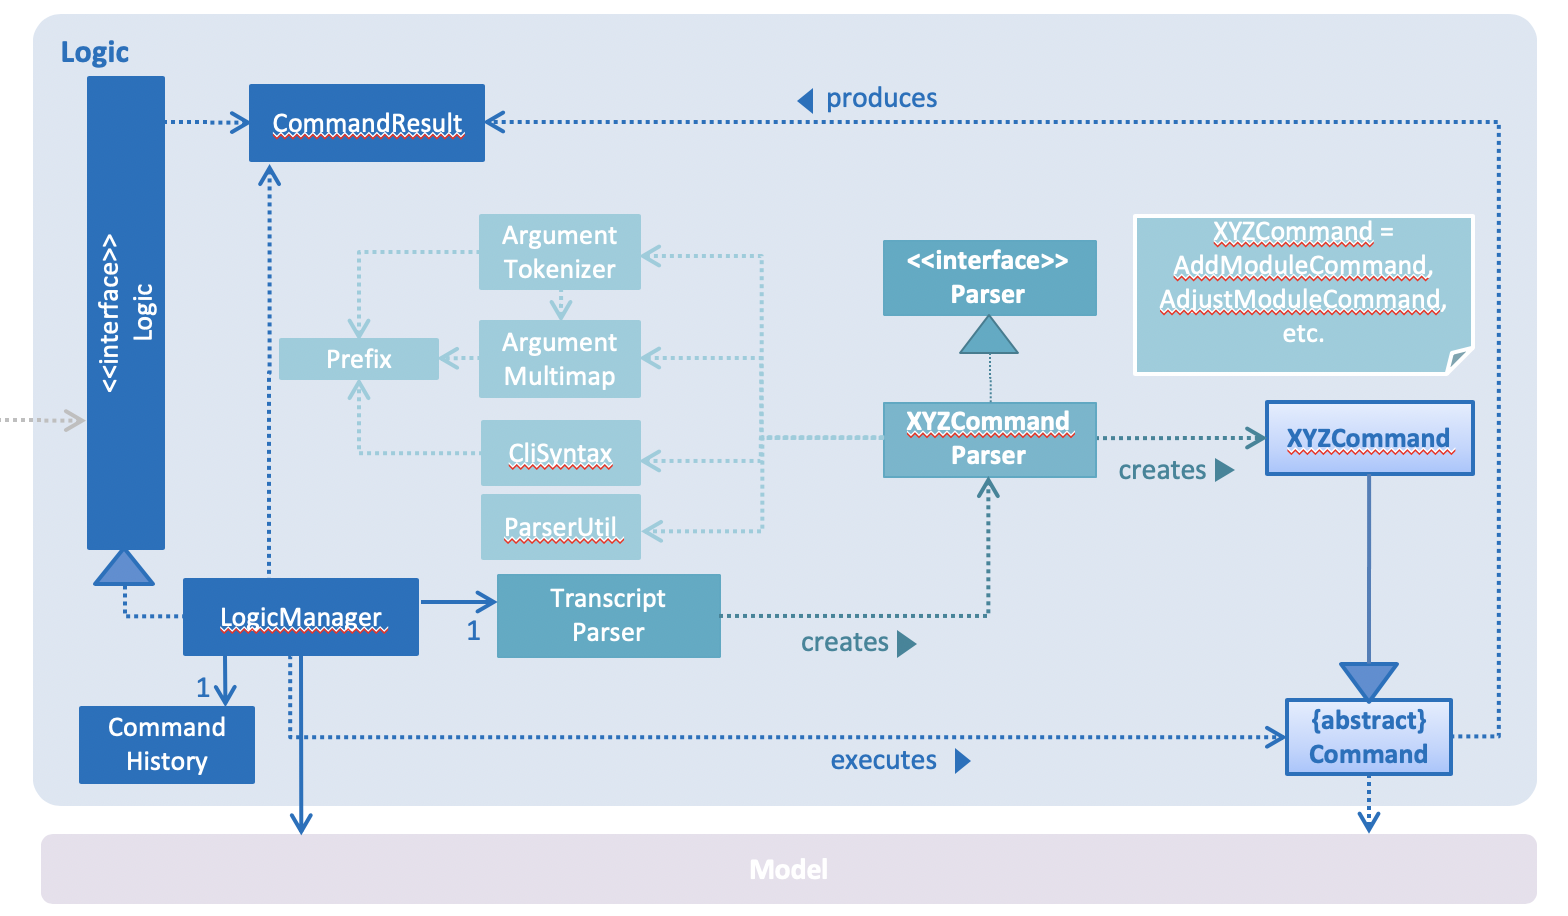
image::[width="800"]
Events-Driven nature of the design
The Sequence Diagram below shows how the components interact for the scenario where the user issues the command delete -t CS2103 -e 4 -z 2.
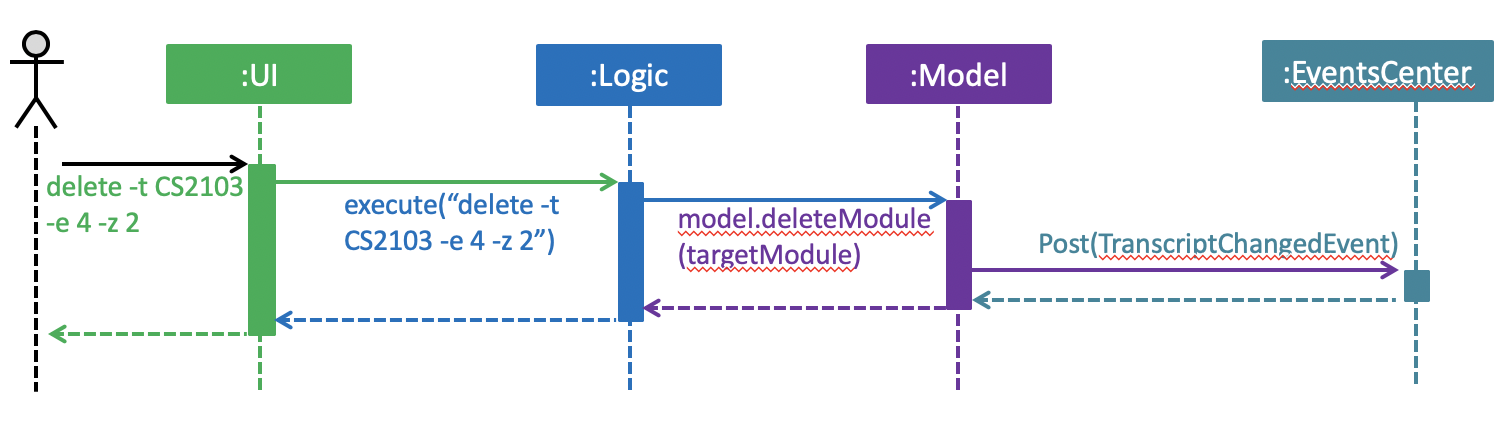
delete -t CS2103 -e 4 -z 2 command (part 1)
Note how the Model simply raises a TranscriptChangedEvent when the Transcript data are changed, instead of asking the Storage to save the updates to the hard disk.
|
The diagram below shows how the EventsCenter reacts to that event, which eventually results in the updates being saved to the hard disk and the panels of the UI being updated to reflect the latest modules in the system.
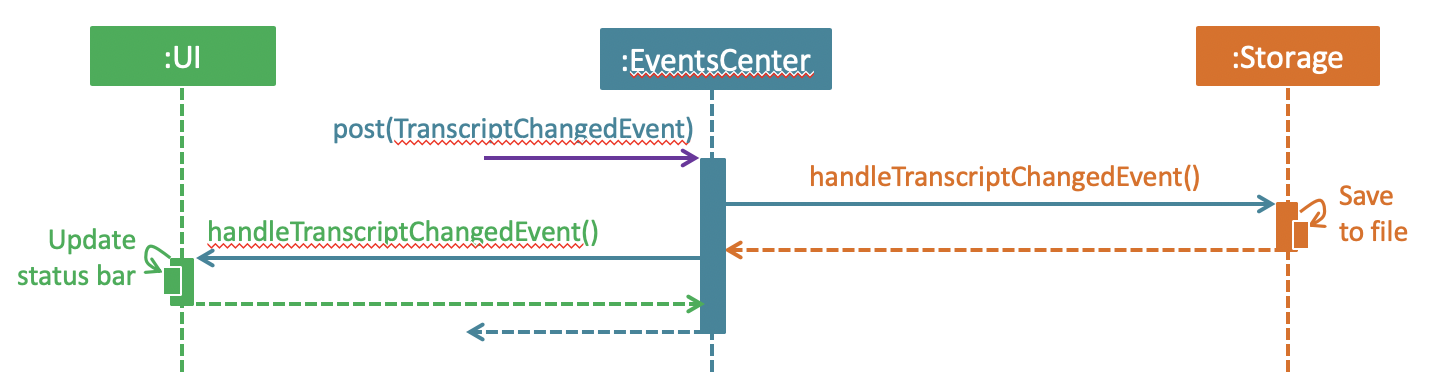
delete -t CS2103 -e 4 -z 2 command (part 2)
Note how the event is propagated through the EventsCenter to the Storage and UI without Model having to be coupled to either of them. This is an example of how this Event Driven approach helps us reduce direct coupling between components.
|
The sections below give more details of each component.
UI component
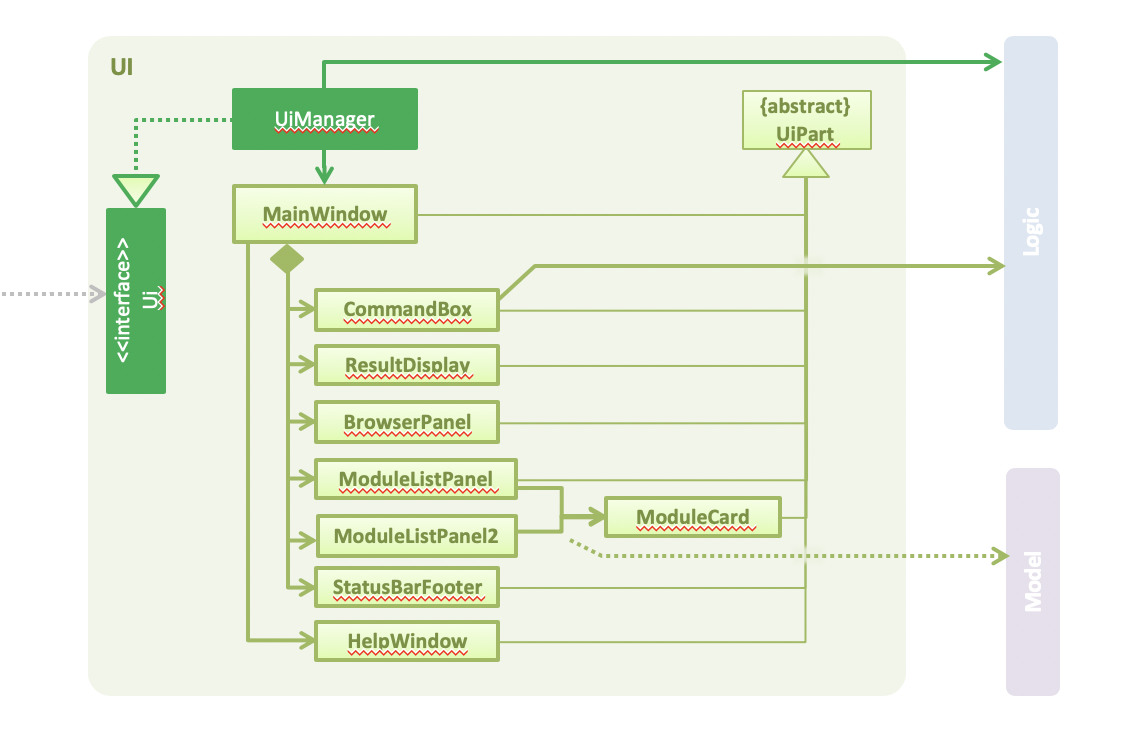
API : Ui.java
The UI consists of a MainWindow that is made up of parts e.g.CommandBox, ResultDisplay, StatusBarFooter, BrowserPanel, 'ModuleListPanel' etc. All these, including the MainWindow, inherit from the abstract UiPart class.
The UI component uses JavaFx UI framework. The layout of these UI parts are defined in matching .fxml files that are in the src/main/resources/view folder. For example, the layout of the MainWindow is specified in MainWindow.fxml
The UI component uses JavaFX UI 'DarkTheme' to draw different text, sizes, fonts, and colours from. The actual data displayed in the UI is called using a sample transcript which is created through the Module and Transcript classes. The values themselves are abstracted from the '.fxml' files so the UI display can be easily updated.
-
Executes user commands using the
Logiccomponent. -
Binds itself to some data in the
Modelso that the UI can auto-update when data in theModelchange. -
Responds to events raised from various parts of the App and updates the UI accordingly.
UI component
-
The bottom two thirds of the UI is seperated into 2 panels to clearly identify the different outputs from commands entered by the user.
-
The first panel on the left is for Modules that have already been completed; this is shown by the GREEN circles which surround the grades which indicate this grade is "set" and of no concern to the user anymore.
-
The second panel on the right is for Modules that have not yet been completed by the user; this is shown by the RED circles which surround the grades to indicate that this is a grade the user should be aware of. The red indicates an urgency towards that module as it’s outcome will affect the users predicted CAP goal.
-
The top third of the UI is seperated into four distinct rows;
-
The first row contains the title and drop down menu’s for
FileandHelpoptions. -
The second row is the command line and how the user interacts with the application. Notice there is no button for the user to click when they are ready to enter their command; it is expected the user is familiar with Command Line Interface and will know to use the
enterbutton on their keyboard when ready to submit a command to the app. -
The third row is where replies from the application to the user will be displayed. When the commands become too big for the box, a scroll down option becomes available for the user to continue reading the message.
-
The fourth row displays the summary of the users current CAP goal and their target CAP.
-
The following was not pushed to Git by me, but I contributed to the final outcome through team discussions during meetings and by sending my own User Stories, Value Proposition, and Target User Profile via Slack and email to members of the team.
Appendix A: Value Proposition
Helps students manage their CAP and predict what grades they need to reach their CAP goal.
Appendix B: Target User Profile
-
An NUS Student who has a need to keep track of current CAP, calculate expected CAP, and grades required to achieve desired CAP.
-
Prefer desktop apps over other types.
-
Can type fast.
-
Prefers typing over mouse input.
-
Is reasonably comfortable using CLI apps. == User Stories
Must-Have
-
As a user, I can add all the modules I have taken (module code, module title, MCs, grade, semester taken) so that I can calculate average mark I need to graduate with desired CAP.
-
As a user I can delete modules so if I change my mind or fail a module I can re-calculate my average.
-
As a user I can delete modules so that if i entered a wrong module or failed it, I can remove it.
-
As a user I can edit the marks I’ve entered previously so that I can update my CAP.
-
As a user, I can enter a CAP goal so that I can keep track of the progress of my course
-
As a user, I can calculate the average mark I need across the modules I’ve entered so I can see what mark I need for each module to achieve my CAP goal.
-
As a user, I can enter in predicted grades for modules so I can see what CAP I would get if I got these grades in my modules.
-
As a user, I can close the app and return to modify my entries so I can enter my entries incrementally.
Nice-To-Have
-
As a user, I can add a module without having to add the code, MCs, or semester taken so that I can quickly calculate CAP without worrying about the modules.
-
As a user, I can still enter the same modules but get warned first so that I would not mistakenly enter the same module again
-
As a user, I can import all modules for this semester with NUSMods link so that my data can be consistent with NUSMods.
-
As a user I can search for a module via keyword or module title, and select it for entering my grade so that I don’t have to remember the module code.
-
As a user, I can adjust what marks I need for each module to achieve my CAP so I can put more emphasis on certain modules instead of expecting the same grade across all modules.
-
As a user, I can view my current semester’s module goals and use a GUI to adjust projected grade for each module, and other modules will automatically adjust to compensate, so that I can see easily modify my data to see what grades I need for other modules.
-
As a user, I can view total current MCs so that i can check if I meet the number of mc I need to graduate
-
As a user I can see if my CAP Goal is possible so I can check whether it is achievable.
-
As a user, I can list modules taken by level as an alternative listing mode, so that it is easier to track graduation requirements.
-
As a user, I can see what the highest possible CAP I can achieve with my current grades is so that I can set an appropriate goal.
-
As a user, I can see what the minimum grades I need per module is to pass the year with my current grades so that I can see what the minimum about of work I need to do is.
Not-Useful
-
As a user, I can view the module descriptions so that I know what modules I should take
-
As a user I can enter the MCs for exchange I can keep track of modules that may not be mapped to our database of modules codes or isn’t the default number of MCs.
-
As a user, I can export my timetable so that I can share it with my friend.